Objective of the Challenge
Our groups goal of this last challenge was to prototype the control interfaces for our final installation and to implement thesoftware stack needed for the audiovisual projection. By doing this we confidently used the majority of the skills gained during the last months of Fab Challenge, as shown in the video below.
Planning and Execution
We divided the group based on skills and interests: Juaco worked on the 3D printing, moulding & casting and soldering, Tatiana figured out how to structure the pipeline in Touchdesigner to receive, remap and send data through various protocols and finally myself worked on the electronics, PCB milling and Ableton soundtrack and. We often teamed up and helped each other out on various tasks but generally we worked in a self-guided way, seeking our groups feedback and ideas after each milestone reached. We can say that our biggest tasks were digital fabrication, biomaterial moulding, PCB milling, electronics, wireless communications, audio & visuals generation.
Extensive Documentation on the GitHub Repository
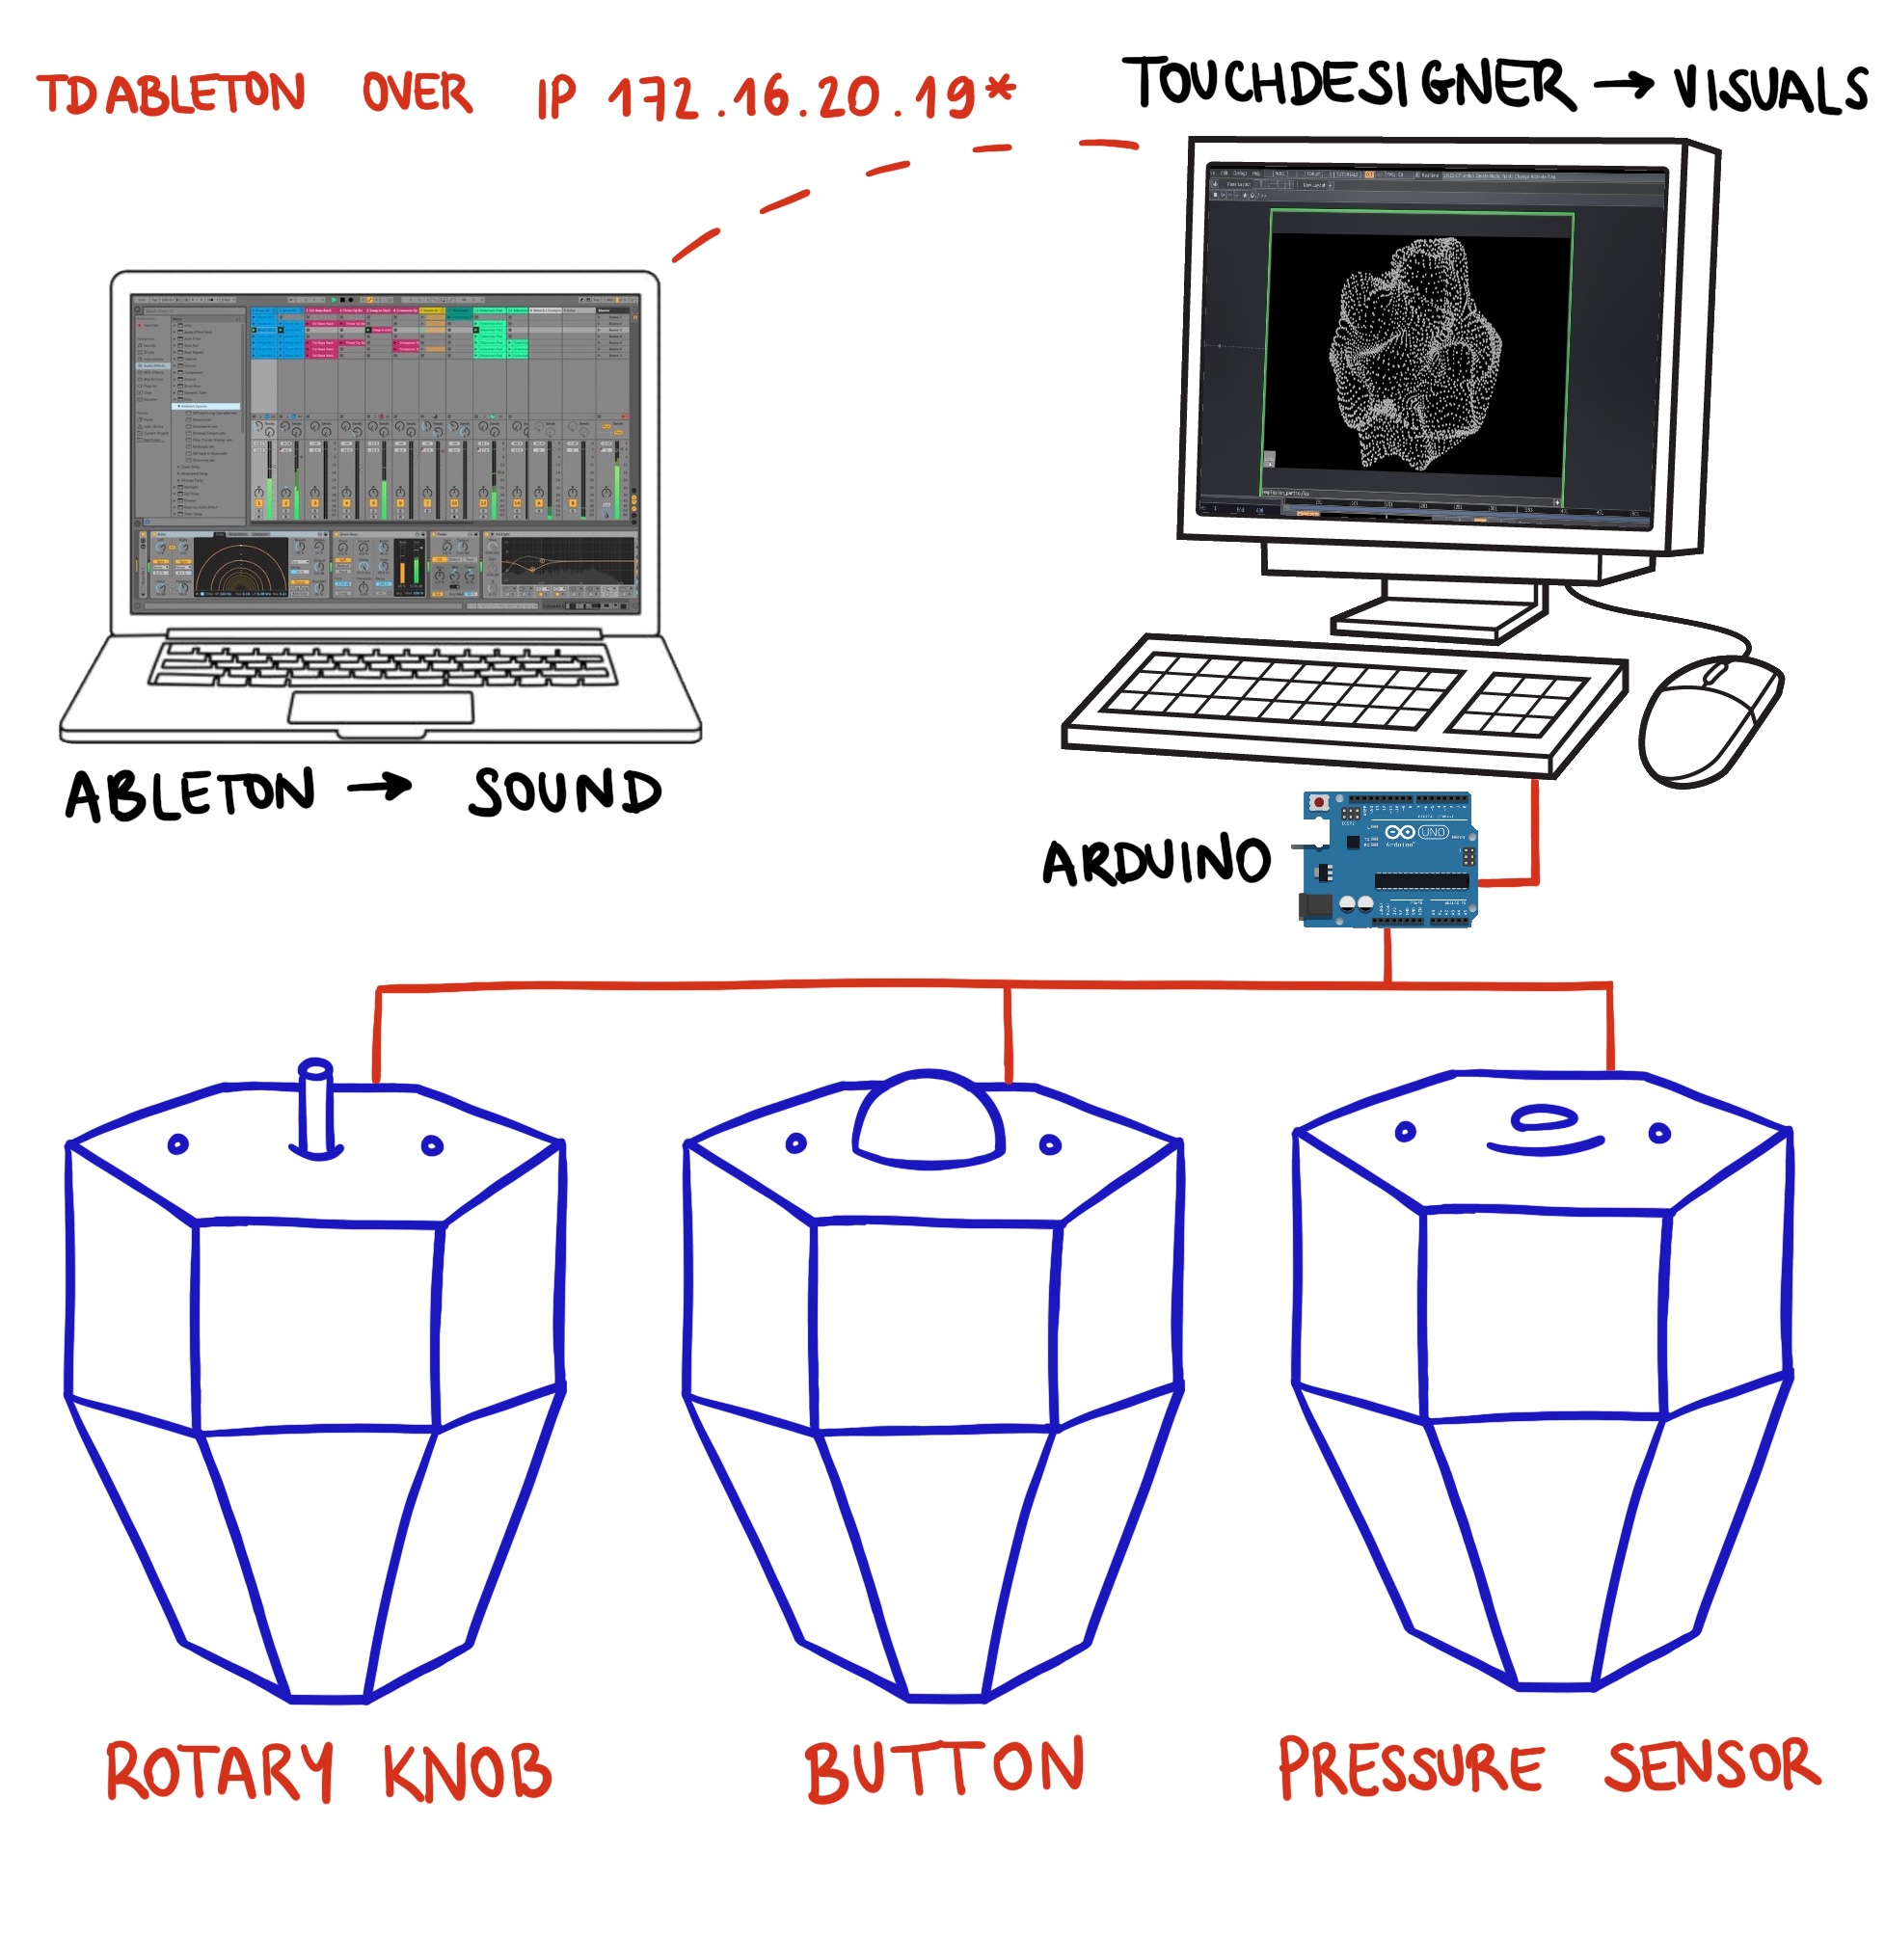
Our final tech stack (left) and the build schematic of our controller archetype (right).
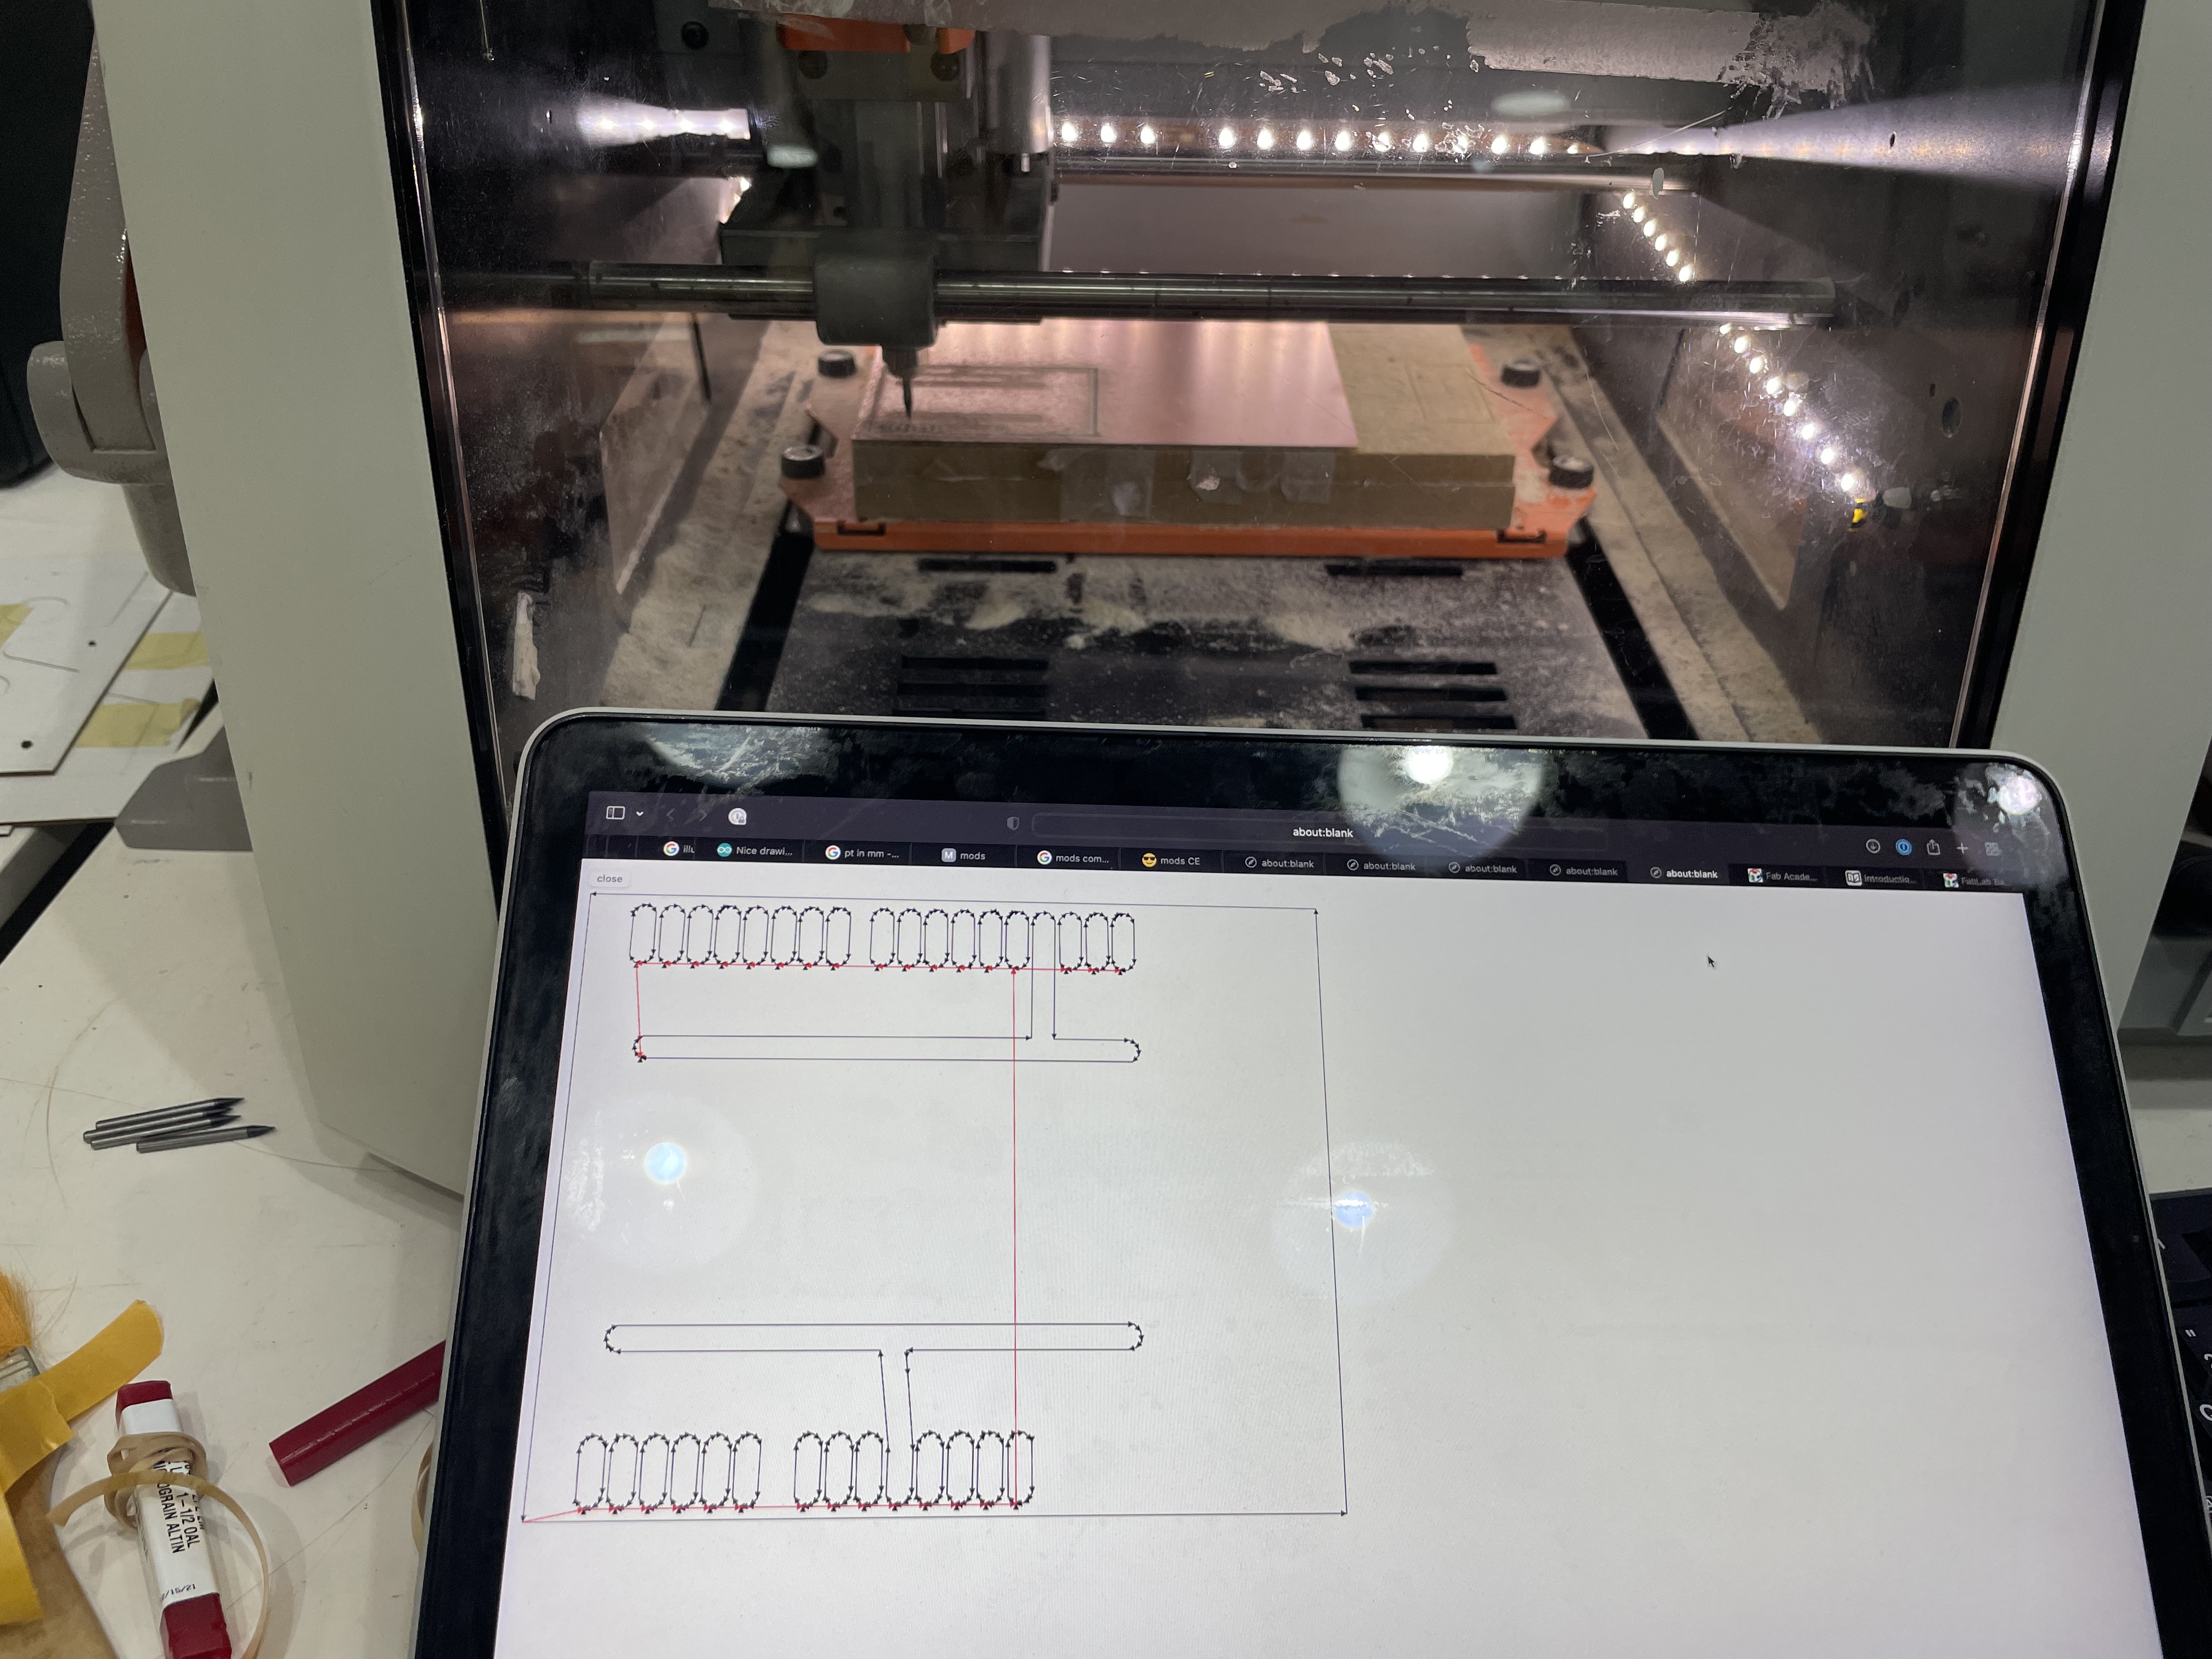
PCB Milling
The function of the PCB was to multiply the 5V and GND pin outputs for the Arduino UNO Rev3. This was necessary to provide an apt amount of available headers for the 12+ control units that will be connected to that single Arduino. After working with Fritzing before in Week 6 (Electronics Design), I gave it another shot but was (again) disappointed by the UX and lack of control over some critical parameters, such as trace width. Then I switched to Illustrator, which is much more bare-bones (because it doesn't offer any kind of presets), but allows an unprecedented control over everything. The board is designed in an inverted way for the female headers to be soldered from the bottom (more on that below), so the design was actually flipped along its horizontal axis. Regardless of potential pitfalls, the design, milling and soldering process was a full success. The outcome is - although nothing too sophisticated - is incredibly effective and something that simplified our prototyping immensely in the process. A more detailed account of the journey can be found in the post for week 10 & 13.
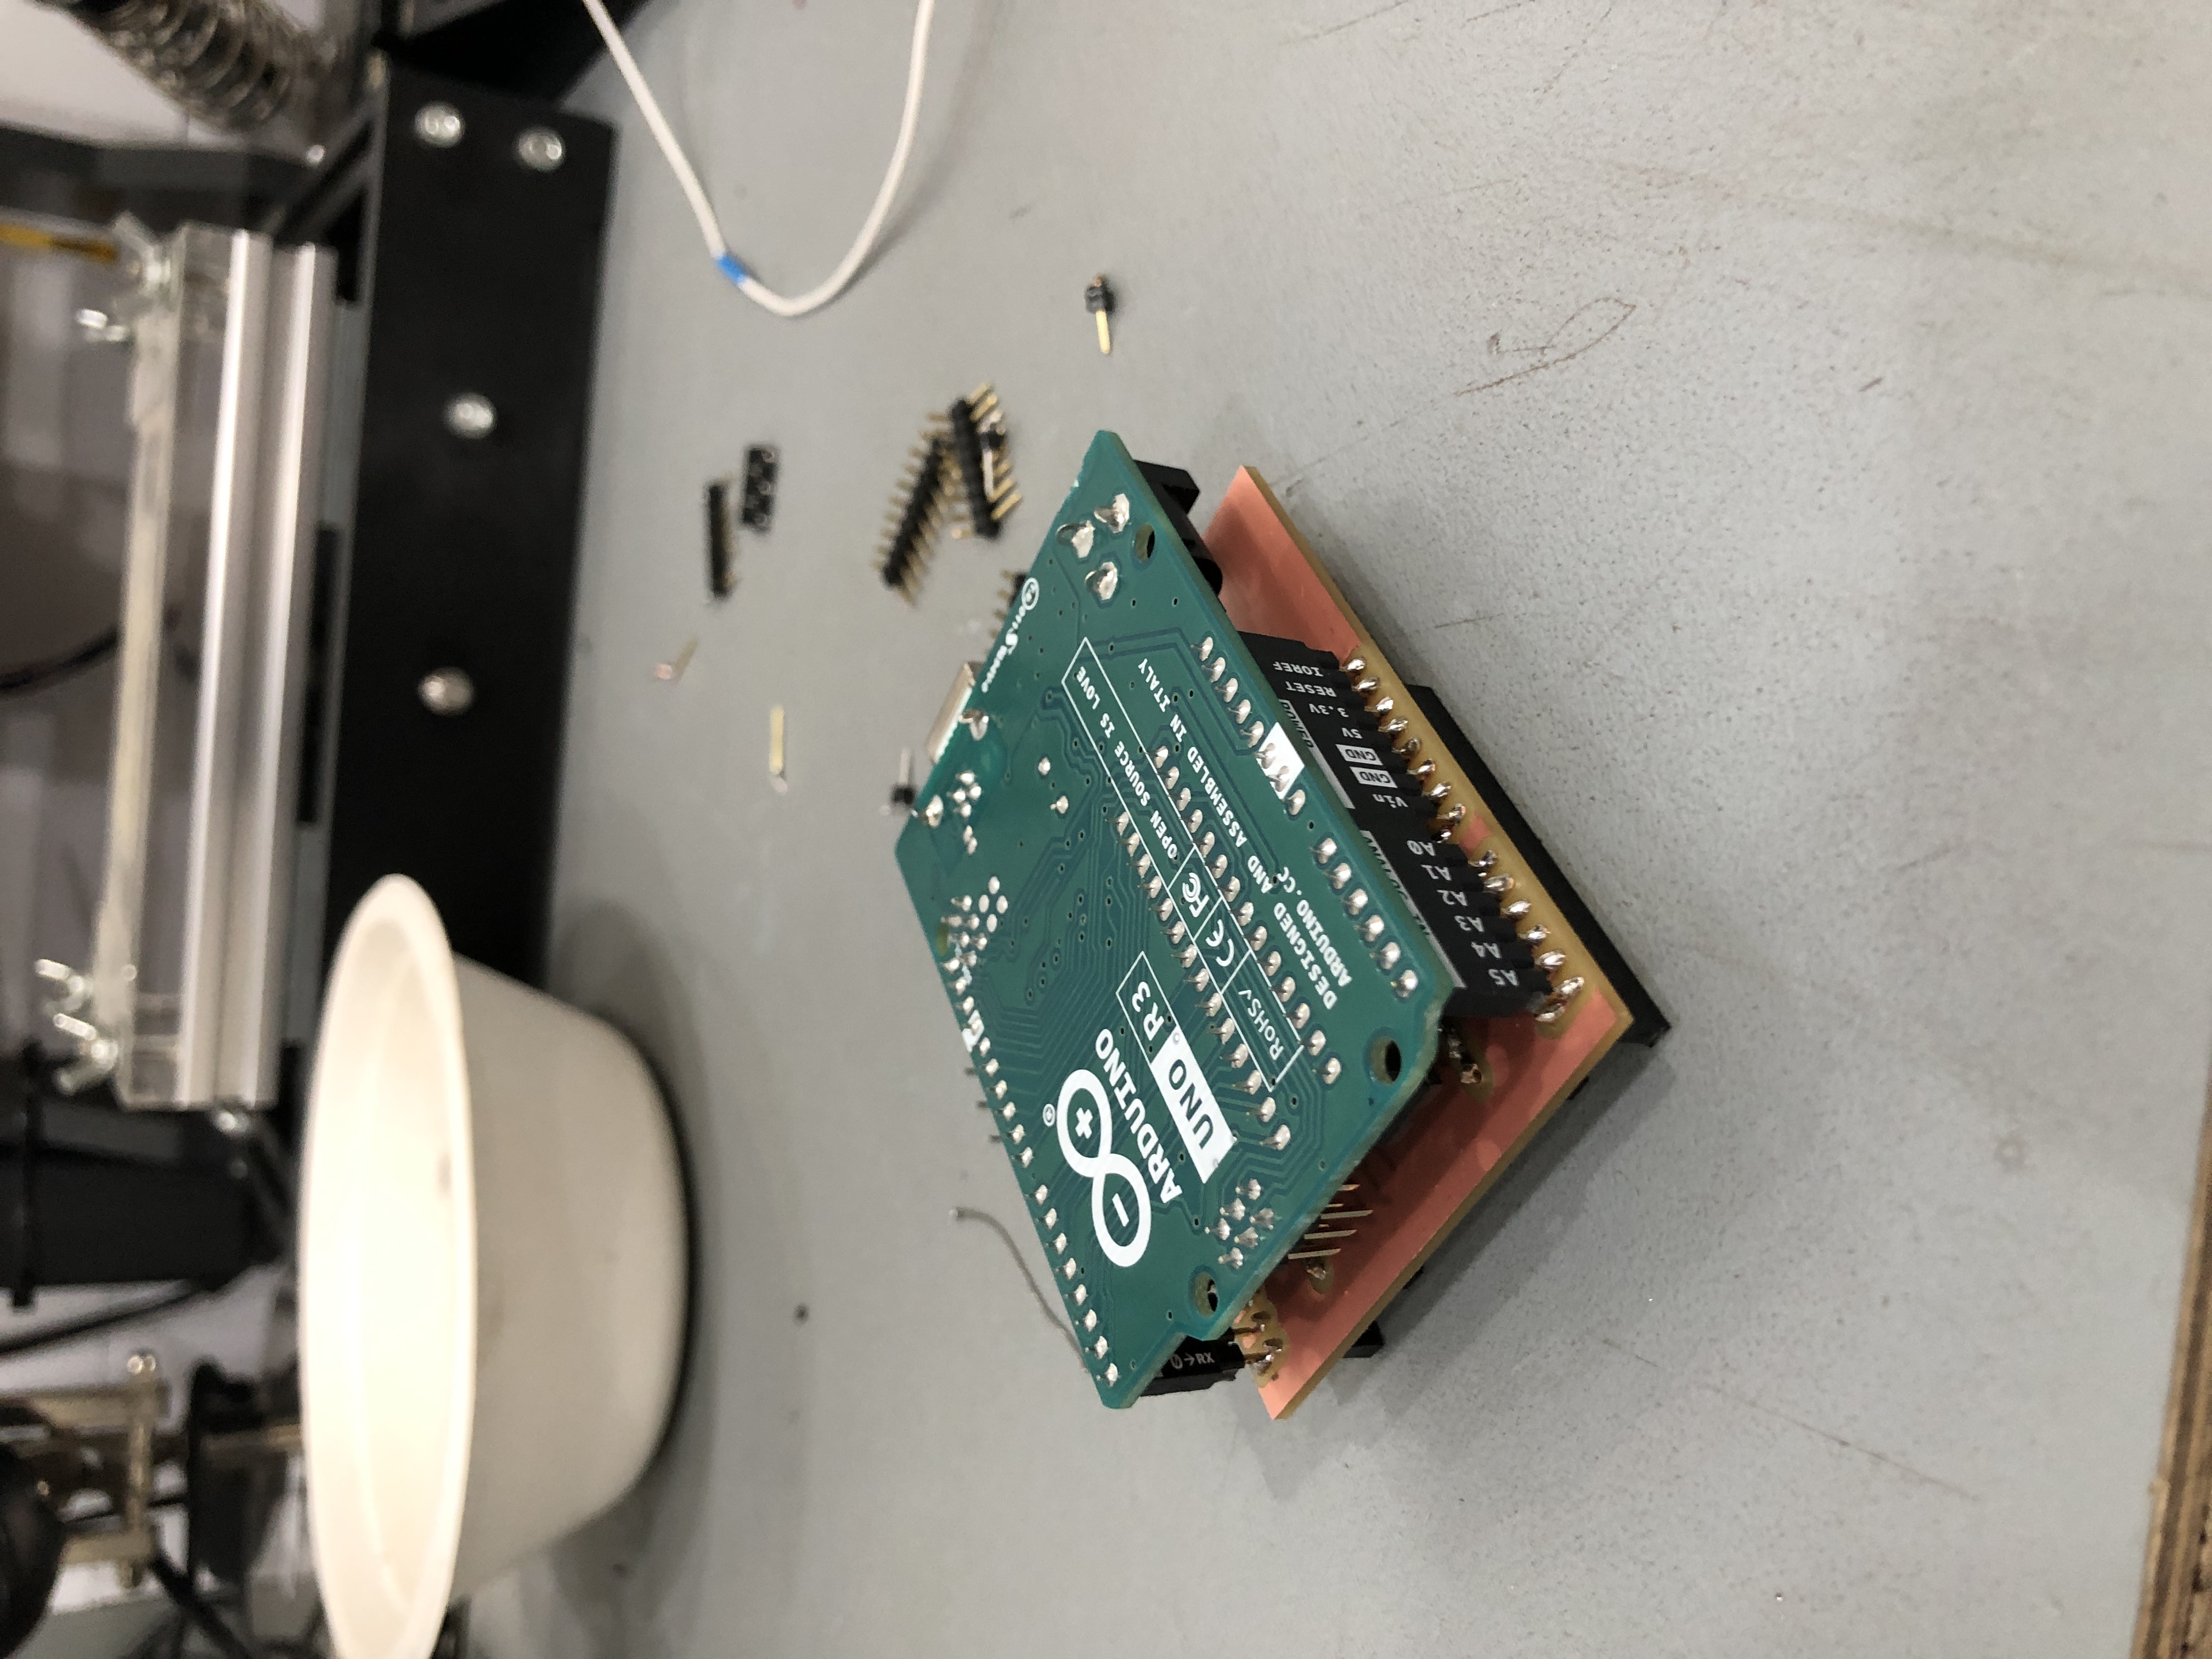
Milling during process (left) and the final soldered outcome (right).
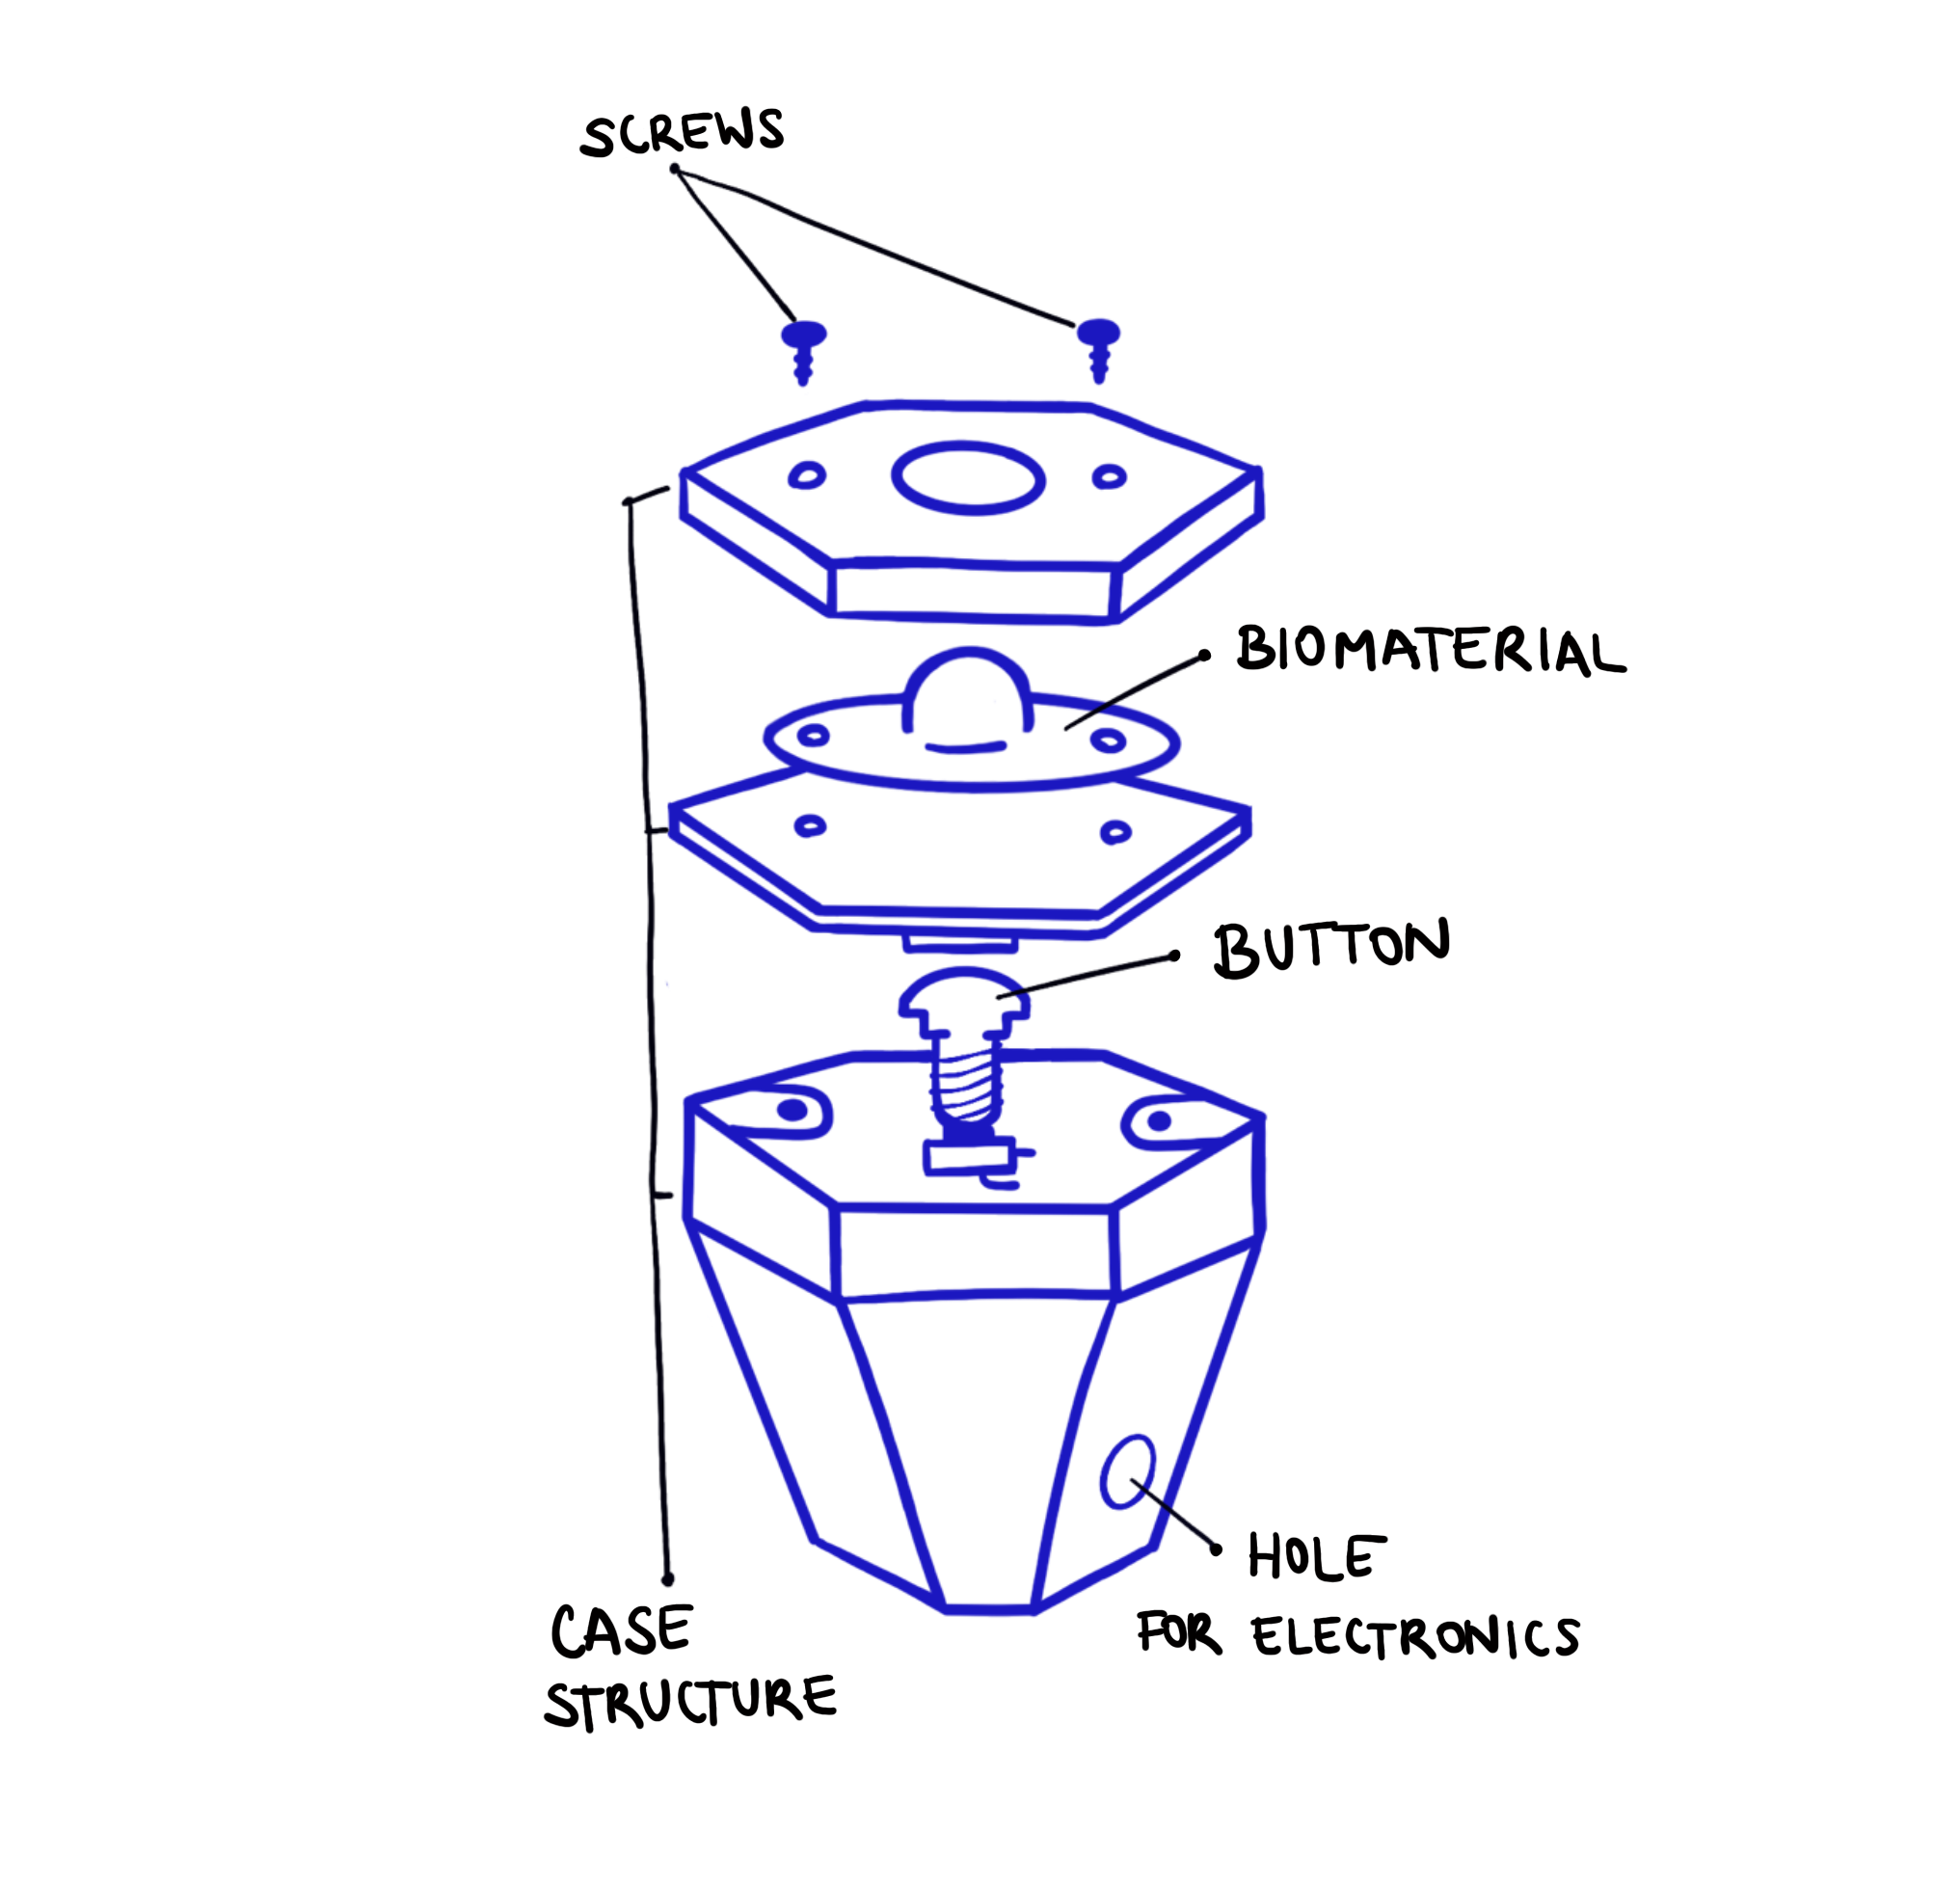
Biomaterials & Controllers
We wanted to make a modular button input system. After initially thinking about producing some sort of playable MIDI keyboard, we thought it could be interesting to incorporate two of Akasha hub's values into the design: decentralization & sustainable relationships. So we designed the possibility for distributed buttons (which could be placed together with magnets or farther away) and rethought the buttons' materiality by using biomaterials. We were inspired by the structure a visual aspect of beehives, which is why we ended up going for the hexagon shape. More on the process in the post for Week 9 (Molding and Casting).


One of our finished biomaterial buttons after roughly two hours of drying (left) and the assembled modular controller after assembling.
Sensors, Arduino & Audiovisuals
Together, we worked on the electronics, iterating based on our testing needs. We started out with a simple button and then proceeded to add knobs and pressure sensors. Together with Tatiana worked on the Arduino code and how to visualize it in Touchdesigner. Our process took us from first manufacturing a cardboard prototype and prototyping the circuitry on a breadboard to a finished 3D printed case with embedded sensors and a milled PCB providing the inputs.
For the audiovisual pipeline we worked in iterations, too:
1. Understanding OSC protocols with TouchOSC app communicating with Touchdesigner (just to get familiar with IP addresses and ports)
2. Receiving data from Arduino by using Serial DAT (operator node which receives serial data)
3. Communicating interchangeably between Touchdeisgner and Ableton, using TDAbleton (MIDI over IP)
In both cases, we scaled up the difficulty over time, once we understood the basics of the software or technique.
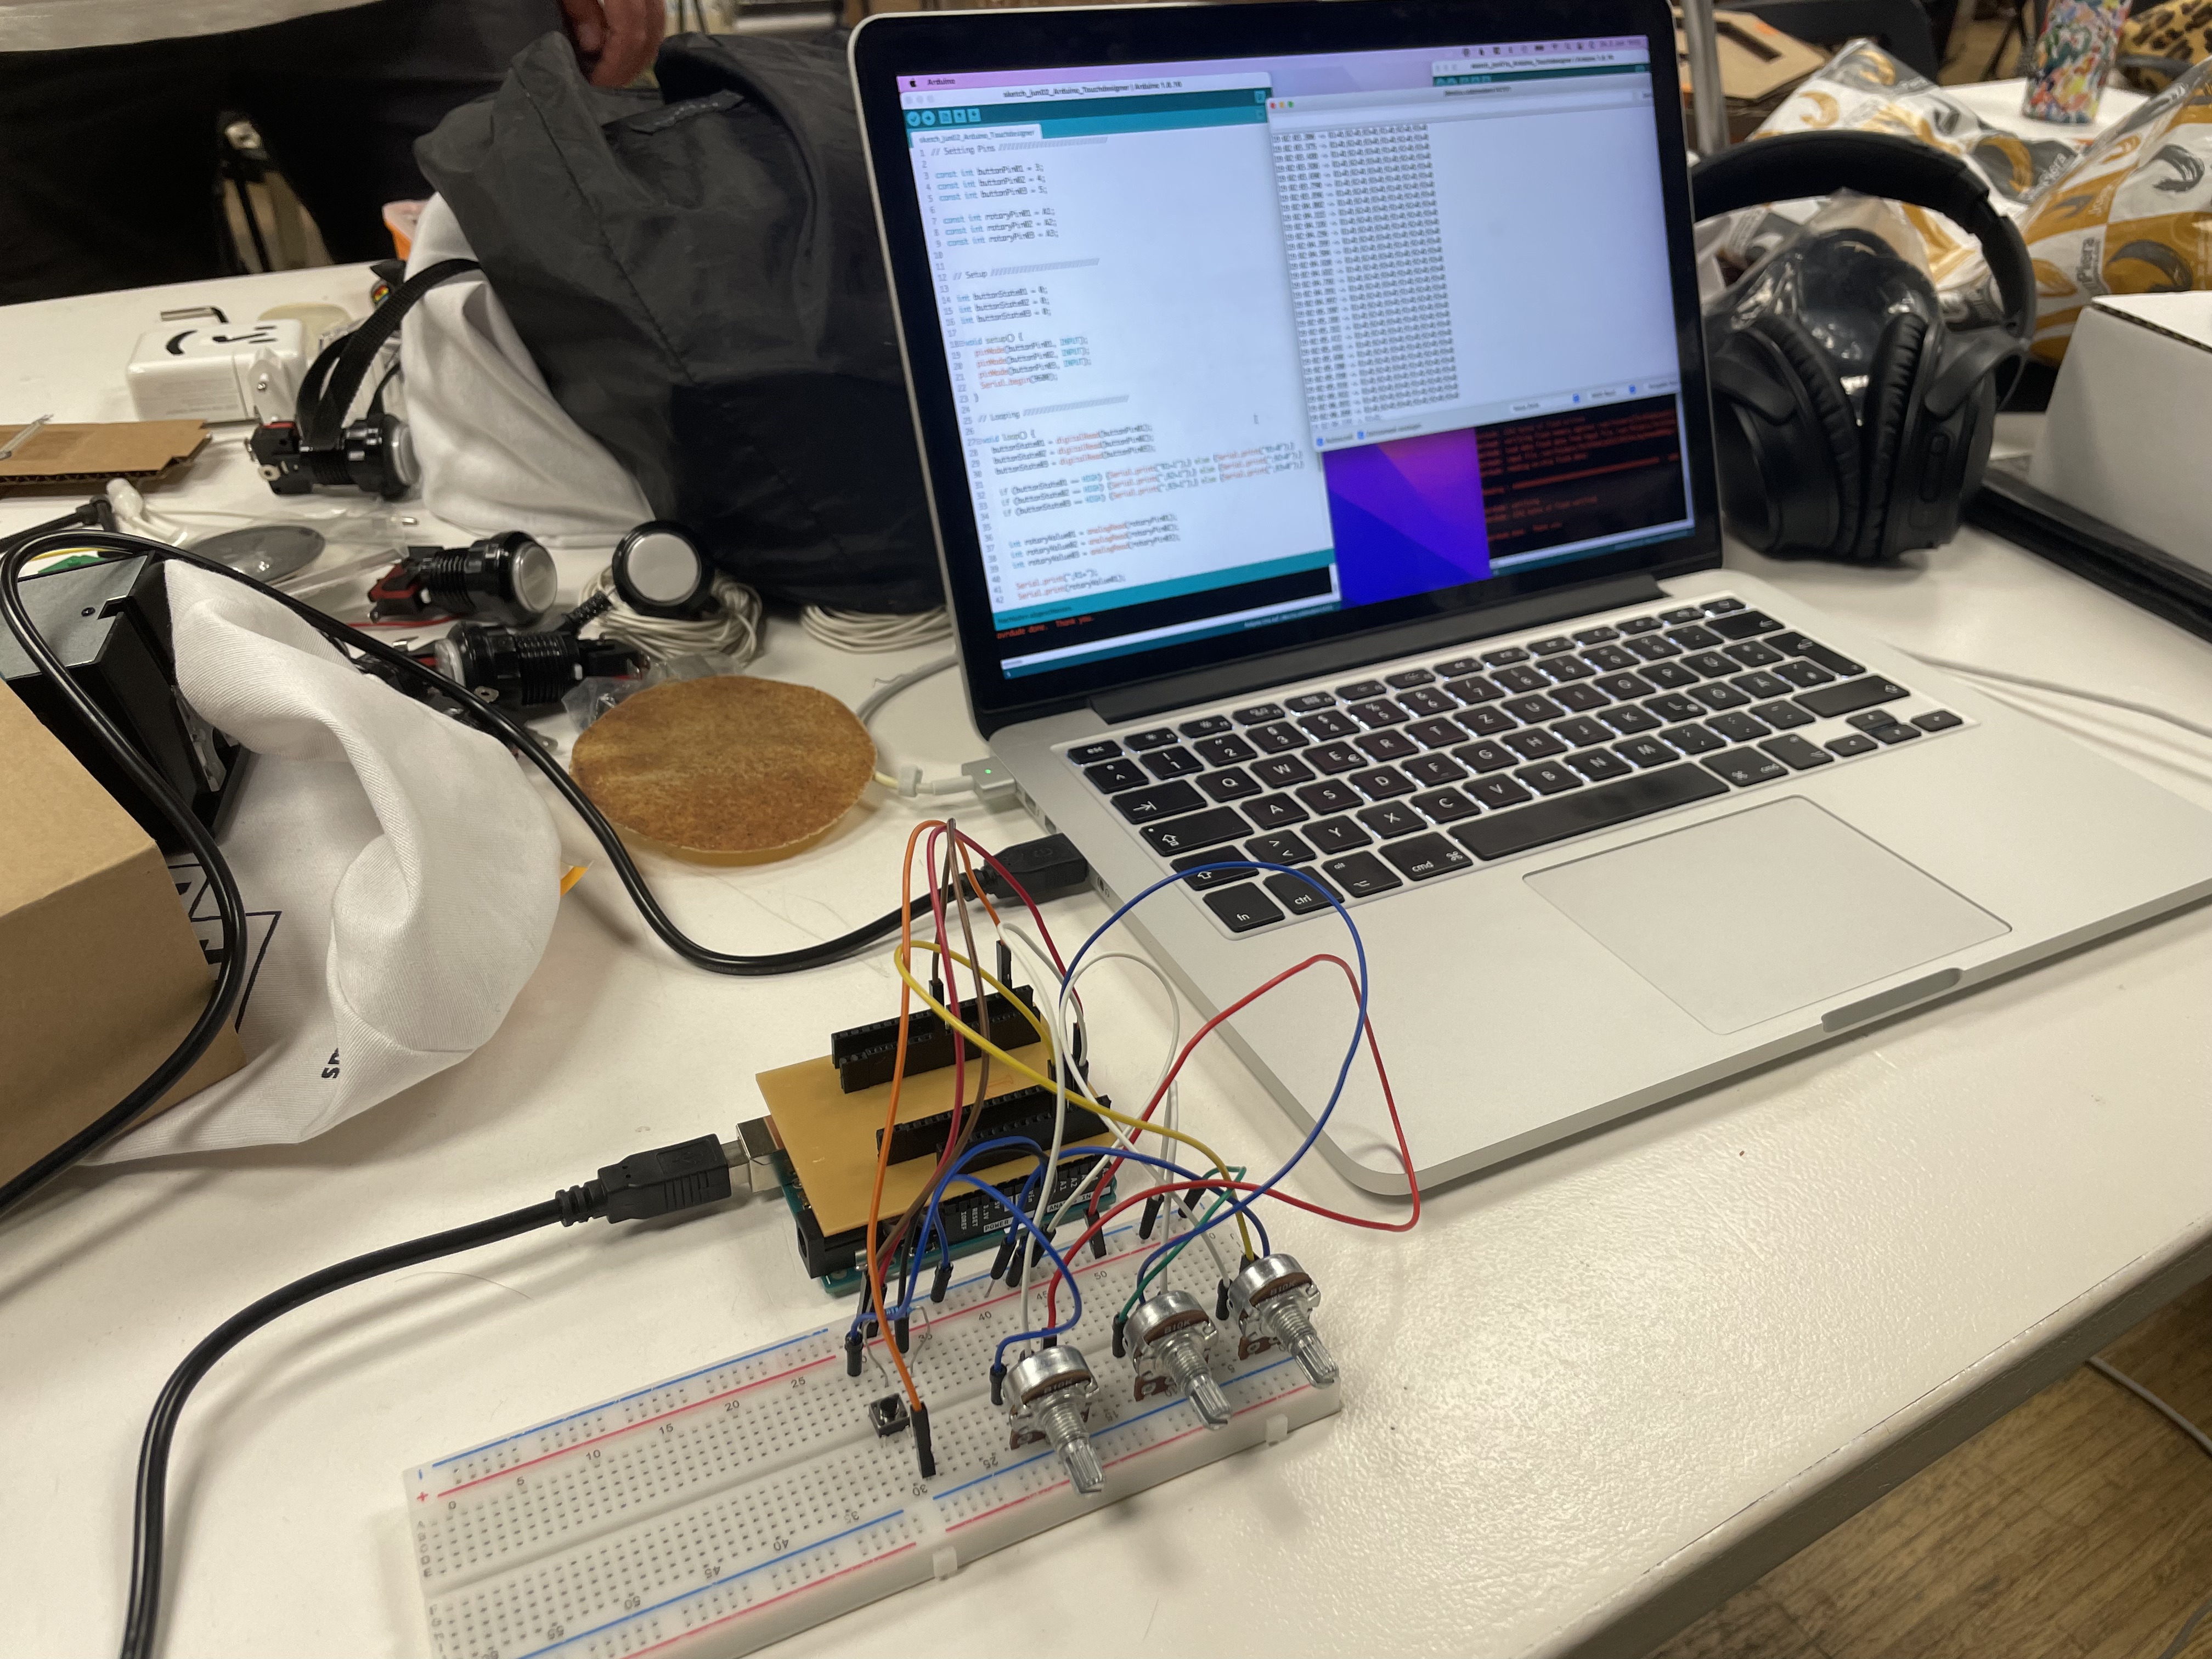
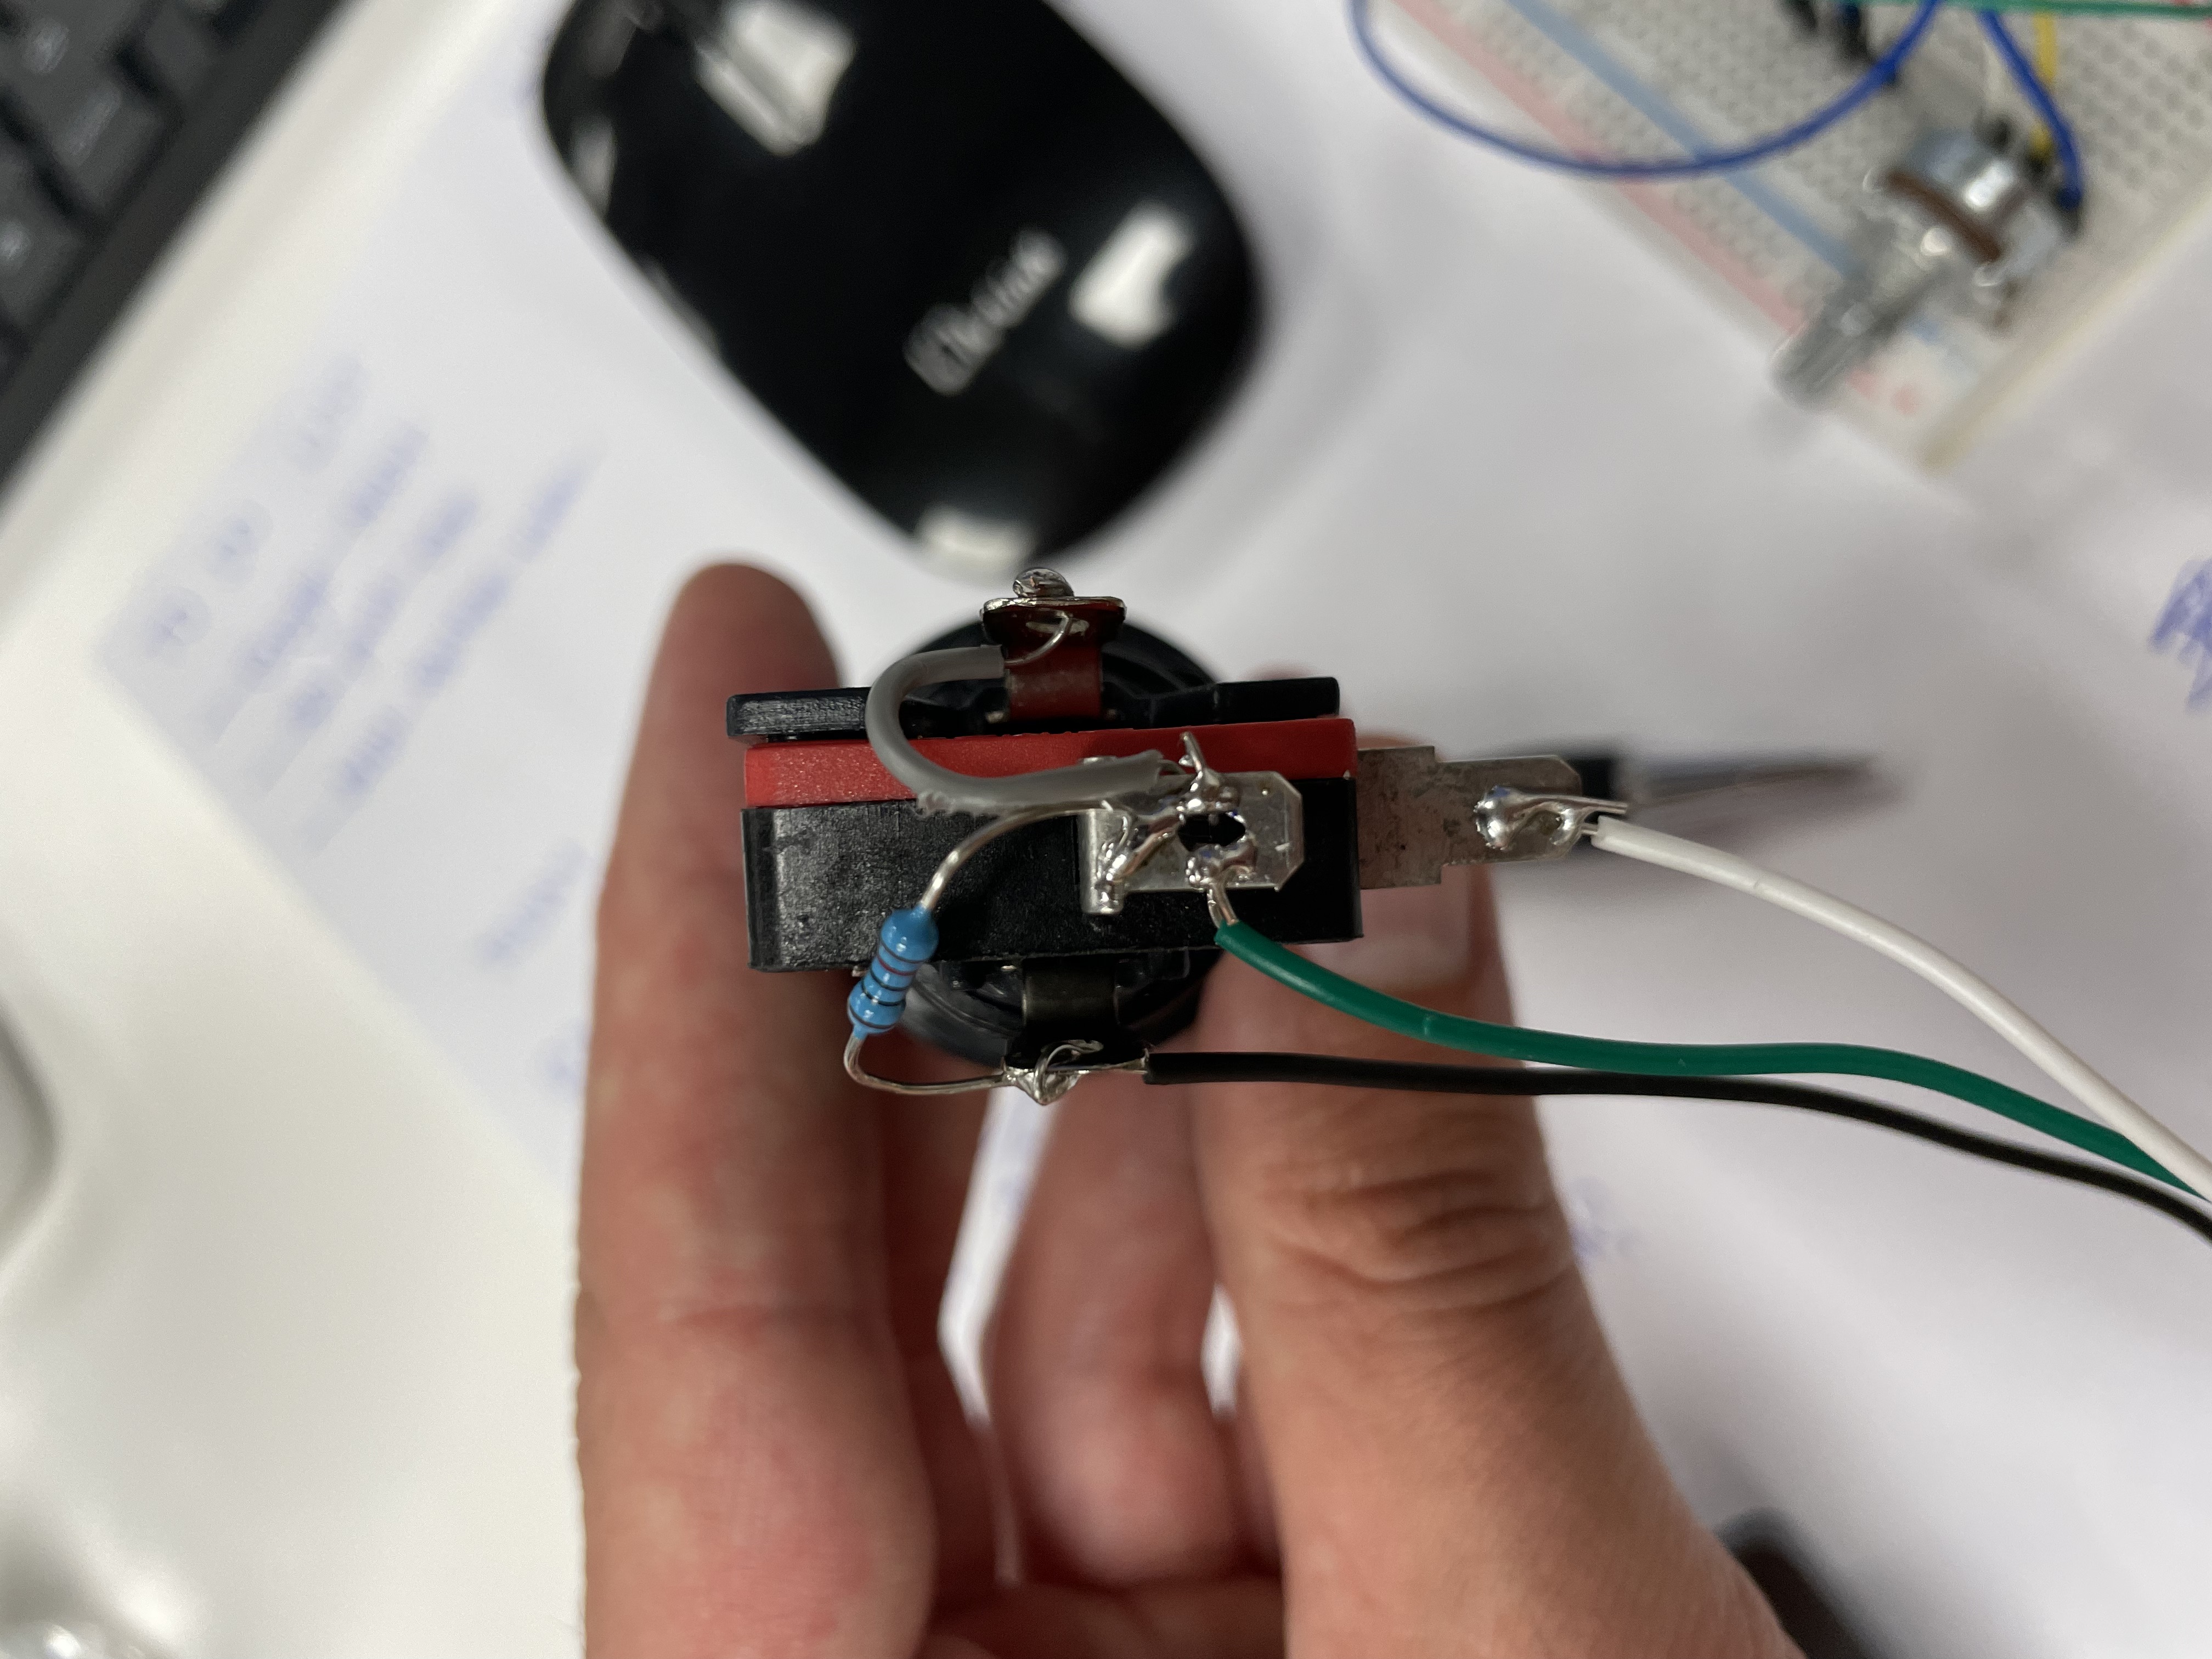
Reading potentiometer & button values and printing them to USB serial (left) as well as one of the quickly soldered arcade buttons, featuring a LED and pull-up resistor (right).
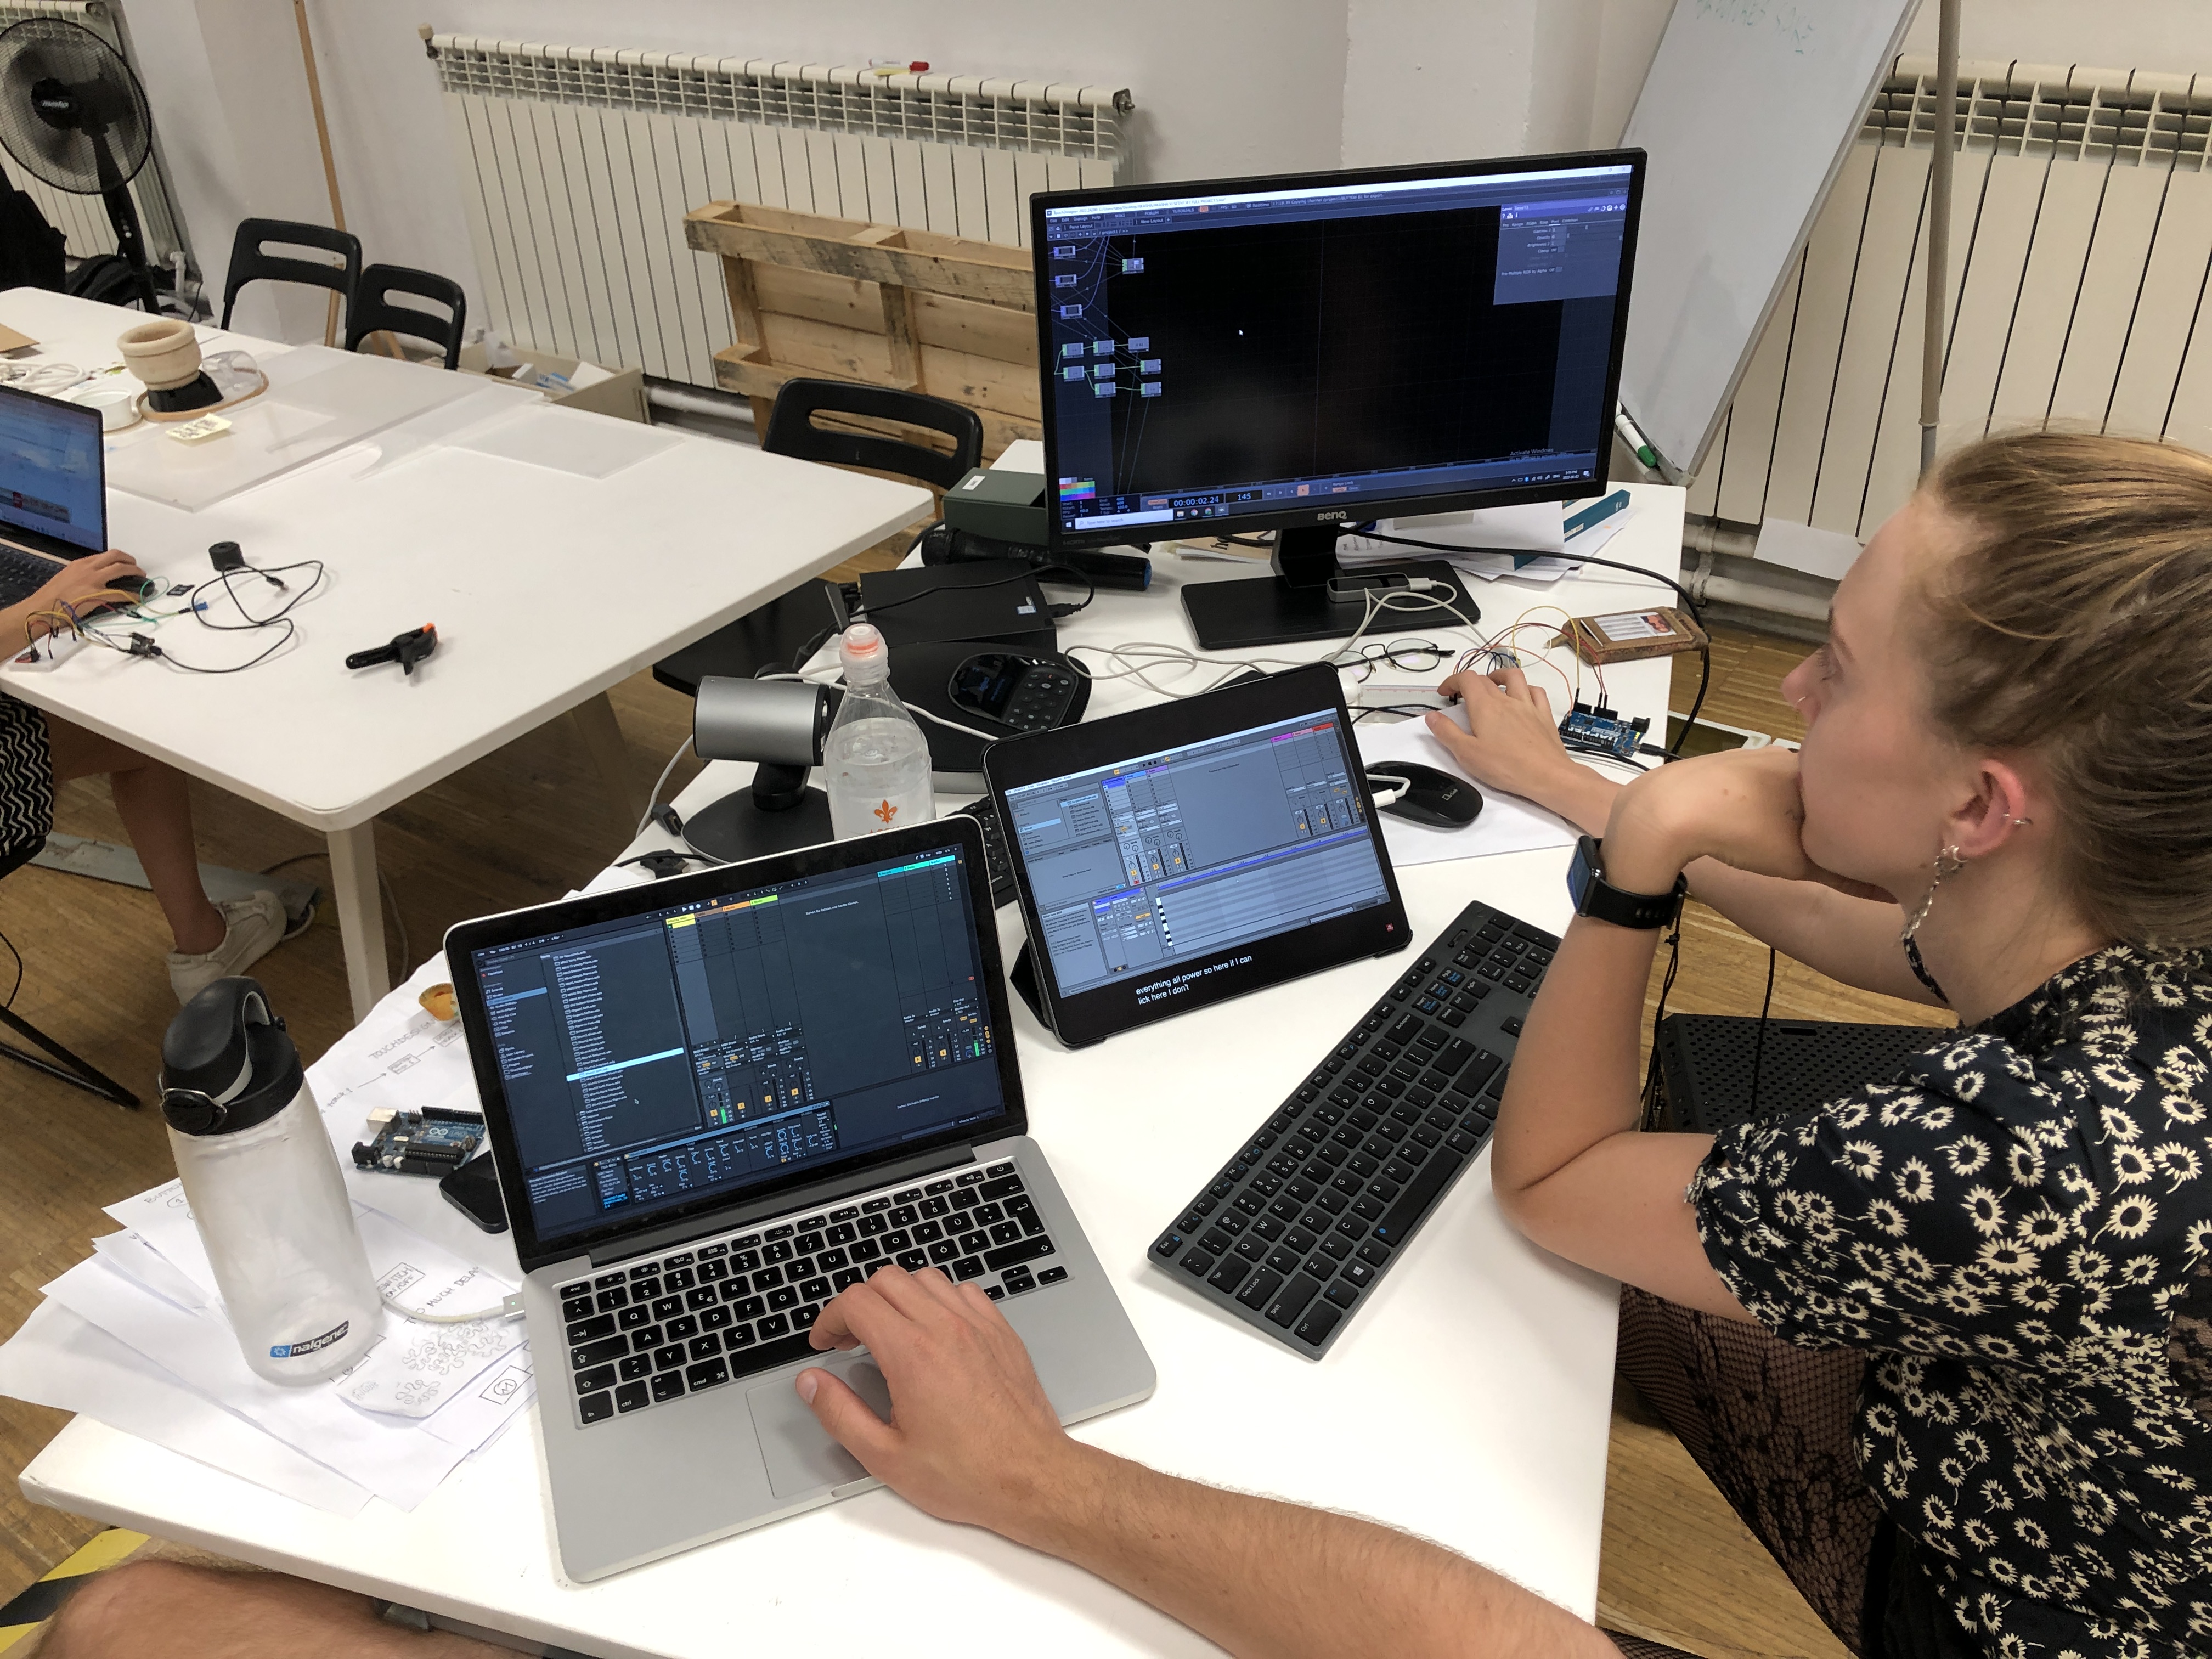
While working on the Touchdesigner & Ableton integration: Ableton running on my machine (left), Touchdesigner running on Tatianas machine (right) and tutorials playing on the iPad in the middle.
Personal Reflection
My contribution to this challenge was designing and milling the PCB, electronics design, Arduino implementation, integration of Ableton and Touchdesigner (together with Tatiana) and the final sound design. As mentioned above (in 'Planning and Execution') we effectively divided up work according to each persons proficiency and time resources and consolidated for feedback once any one of us reached a milestone. This way of working together felt fast, effective, organic and intentional. It allowed us to be highly flexible in order to react to problems that appeared and to avoid potential crunch time towards the end of the week.
This, combined with a fundamental iterative design and prototyping process, it allowed us to naturally learn as we go and directly implement our insights in the following iteration. As an example, we came from a simple cardboard prototype to finished controller in three distinct prototyping iterations. Furthermore, we went through about five development cycles from TouchOSC triggering Ableton to achieving a fully integrated hardware and software stack consisting of sensors, an Arduino, Touchdesigner and Ableton (using three different protocols in the process). All together, I am incredibly proud of our group's collective effort this week and I'm very excited to see where this journey leads us in regards to our final presentations in the end of the month.